

Replacing damper felts in upright pianos is essential for maintaining sound clarity and preventing unwanted ringing or buzzing. Over time, these felts wear down, harden, or develop grooves, leading to poor sound quality. This guide explains how to identify worn damper felts, the tools you’ll need, and the steps to replace them effectively. Here’s what you need to know:
- Signs of Worn Damper Felts: Lingering notes, buzzing sounds, or visible damage like grooves or hardened felt.
- Tools Required: Utility knife, glue (hot hide glue preferred), scissors, and pliers.
- Damper Felt Types: Unicord for bass, double-wedge for tenor, and flat/block for treble.
- Replacement Process: Remove old felt, clean the damper head, attach new felt, and adjust alignment.
If the process feels too complex, professional technicians can ensure precise alignment and address deeper mechanical issues. Proper maintenance preserves your piano’s sound quality and longevity.
Replacing Vertical Piano Damper Felts – Piano Tuning & Repair I HOWARD PIANO INDUSTRIES
sbb-itb-b8bc1ab
When and Why to Replace Damper Felts
Damper felts should be replaced when you notice specific sound issues, like a note continuing to ring after you release a key. One clear sign is when the sound lingers instead of stopping immediately. Steve’s Piano Service explains this well:
"When you strike a key in the middle or bass, and when you let it up, if it keeps ringing on, you probably have a damper problem." [3]
These auditory clues are your first hint that replacement might be necessary.
Take a look inside your piano to inspect the damper felts. Good-quality felt will feel soft and fluffy, but over time, it can harden and develop a crusty texture. You may also see deep grooves caused by years of use [2]. In some cases, the felts might become uneven or visibly damaged. If the adhesive deteriorates, you could even find white damper felts at the bottom of the piano cabinet [3].
Another sign to watch for is buzzing noises. As Joseph Forster of Sterling Piano Tuning points out:
"Dampers will vibrate against the string and make an unpleasant buzzing noise when they break contact or come back into contact with the string." [4]
This buzzing suggests that the felts are no longer effectively absorbing string vibrations.
Replacing worn damper felts promptly can make a big difference. Fresh felts ensure clean note releases, improve sound clarity, and help maintain your piano’s value and longevity.
Tools and Materials for Damper Felt Replacement
Before diving into damper felt replacement, it’s important to gather the right tools and materials. A sharp utility knife, Exacto knife, or razor knife is essential for cutting away old felt and cleaning the wooden damper head of glue and fibers. For those planning to remove the damper lever from the action rail to work outside the piano, a long-blade flange screwdriver will come in handy [2] [3].
Choosing the right glue is key. Hot hide glue is the preferred option for a strong, reliable bond. If that’s not available, PVCE glue is a good alternative. To remove old glue, applying heat or warm water can help soften it [1] [2]. As Howard Piano Industries points out:
"The best glue to use is hot hide glue… PVCE glue is the next best choice." [2]
High-quality damper felt makes a big difference. Look for piano felt made with at least 70% wool and a multidirectional weave, which ensures durability and prevents premature wear [7]. Steve’s Piano Service emphasizes:
"Piano felt is at least 70% wool, and it is woven in two directions or even three. Again, cheap felt is OK for making hats, but NOT in pianos." [7]
Avoid synthetic or lower-quality felts, as they lack the necessary density and longevity for proper piano performance [7].
Choosing the Right Damper Felts
Different sections of the piano require specific felt shapes to match the string configuration. For single-string bass notes, unicord felts are ideal. In the tenor section, double-wedge or V-shaped felts fit between strings for optimal damping. For the higher treble notes, flat or block felts are typically used [2] [3].
It’s also important to measure the depth of your existing dampers. Common sizes include 3/8 inch and 7/16 inch. If there’s enough clearance, opt for the thicker 7/16-inch felt to avoid over-stressing the damper springs [1]. Keep in mind that damper felts are graduated in size – larger, thicker felts are used for lower notes, while smaller, thinner felts are for the high treble [2] [3]. Professional-grade felts often include a red cloth backing for added stability and may feature stitching to help them hold their shape [3].
Additional Tools for Precision
For better accuracy during installation, a few specialized tools can make a big difference. Smooth needle-nosed pliers are useful for opening new felts, while wire-bending pliers help adjust damper head alignment [6].
Using a mirror behind the action lets you check whether the back of the damper felt is seating properly against the strings [6]. To ensure uniform height, a simple height jig – made from a capstan and a piece of wood – can be used to hang all dampers evenly [3] [6]. For trimming excess felt or tapering edges to match factory specifications, sharp scissors (like Fiskars) or a rotary cutter are excellent tools [2] [6].
With these tools and materials ready, you’ll be well-prepared for the step-by-step replacement process outlined in the next section.
Step-by-Step Guide to Replacing Damper Felts
Step-by-Step Guide to Replacing Piano Damper Felts
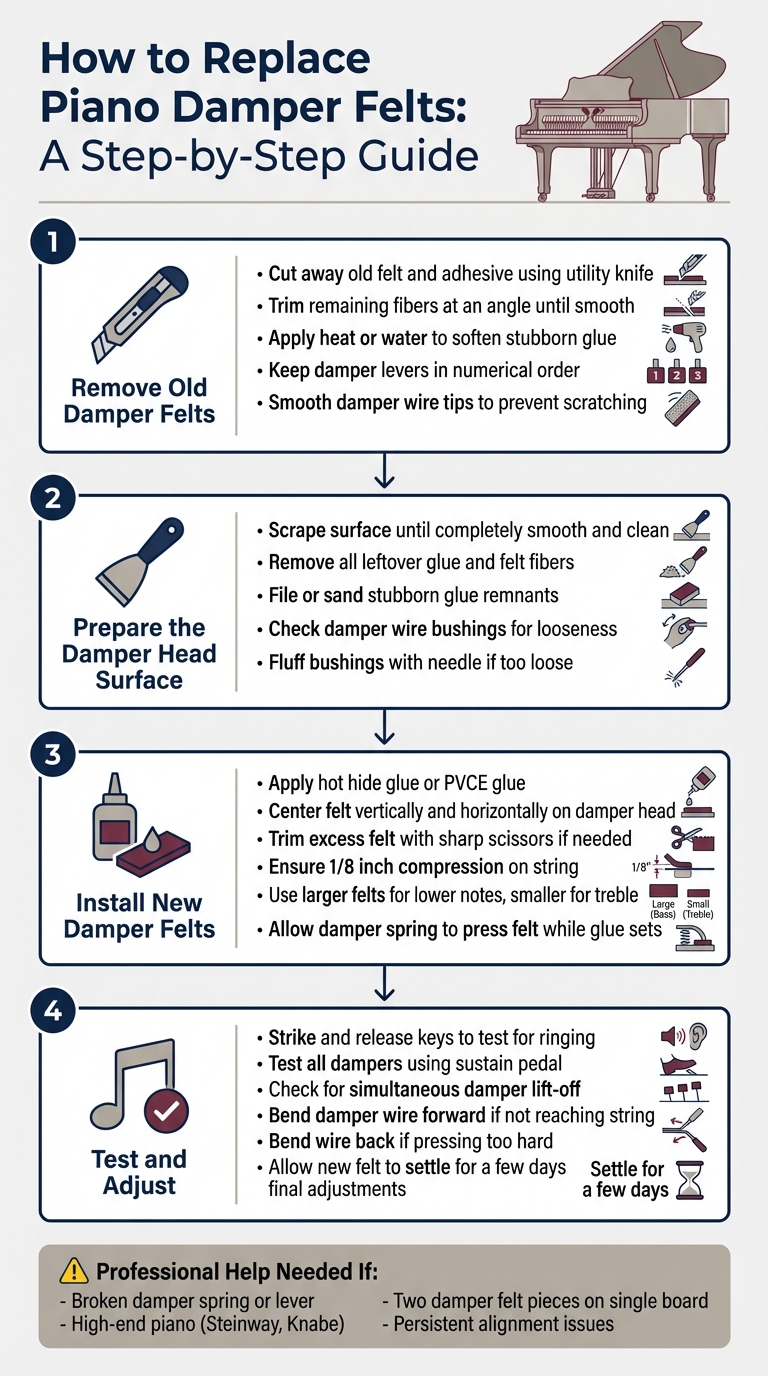
Removing Old Damper Felts
Start by carefully cutting away the old felt and adhesive from the damper head using a utility knife, X-Acto knife, or razor blade. Be cautious not to damage the wooden surface underneath [2][3].
Steve’s Piano Service highlights the importance of this step:
"Remove the old felt with a razor knife. Be sure to leave behind the flat wood board which the felts mount to." [3]
After removing most of the felt, trim away any remaining fibers at an angle until the surface feels smooth [2]. For glue residue that’s tough to remove, apply a bit of heat or water to soften it before scraping [1]. If you’ve removed the damper lever to work on a bench, make sure to keep the levers in their proper numerical order to avoid confusion during reassembly [2]. While the dampers are out, take the opportunity to smooth the tips of the damper wires. This prevents them from scratching the felt bushings when you reinstall them [6].
Once all the old material is cleared and the damper wires are smoothed, the surface is ready for the next step.
Preparing the Damper Head Surface
To ensure the new felt adheres properly, the wooden damper head must be completely smooth and clean. Any leftover glue or felt fibers can interfere with the seating of the new felt [2].
Howard Piano Industries offers this advice:
"Try not to remove wood or your finger… scrape it like this with my knife. Which gets all the fibers off. Get that nice and clean." [2]
Continue scraping until the surface is smooth. For stubborn glue remnants, you can file or sand them down. While you’re at it, check the damper wire bushings for looseness. If they’re too loose, gently fluff them with a needle to ensure a snug fit [2][5][6]. This step is key to creating a proper foundation for the new felt.
Installing New Damper Felts
Once the damper head is clean and smooth, it’s time to attach the new felts.
You can install the new felts either on a workbench or directly in the piano. If working on a bench, lay the action horizontally so the damper blocks are facing upward, making it easier to secure the felts as the glue dries [1][3]. If you’re installing the felts in the piano, apply glue to the felt, lift the damper head, and slide the felt into position. The damper spring will naturally press the felt against the string, acting as a clamp while the glue sets [3].
Make sure the felt is centered both vertically and horizontally on the damper head [2][3]. If the replacement felts are too long – common in the tenor/treble range – trim them with sharp scissors or a rotary cutter to match the original size [2]. Keep in mind that damper felts are sized differently: larger felts go on the lower notes, while smaller ones are for the high treble [2][3]. The damper should press down about 1/8 inch on the string to fully mute vibrations [1]. New felt may initially feel fluffy, but it will compress and settle into the strings after a few days [3].
Testing and Adjusting Damper Felts
Once the glue has dried, strike and release a middle or bass key. If the note keeps ringing, it’s a sign that the damper either isn’t seating properly or the spring might be too weak [3]. This simple test ensures the dampers are sealing correctly, as outlined earlier.
For a thorough check, test all the dampers using the sustain pedal. Press and release the pedal repeatedly to confirm that all dampers lift and return in unison [6]. Piano technician Craig Brougher highlights the importance of this step:
The only thing that must be exactly simultaneous is when the dampers all lift off their strings. Keep checking this parameter, because it must be perfect. [1]
Each damper should compress about 1/8 inch into the string [1]. If a damper isn’t reaching the string, gently bend the damper wire forward. On the other hand, if it presses too hard and makes the key feel heavy, bend the wire back slightly [1]. A small mirror can be helpful for viewing the back of the dampers, which is otherwise difficult to see [6]. After making initial adjustments, allow the new felt to settle before fine-tuning.
Hold off on making major adjustments right away. New felt may feel soft at first but will compress naturally over a few days [3]. Let it settle before performing any final regulation work.
If a damper head tilts and lifts unevenly from front to back, you can fix this by pressing down on the front of the damper while supporting the flange [6]. Ensure the alignment matches the original setup to maintain uniform damping. Also, check that each damper felt is centered on the strings and parallel to neighboring dampers. If the damper wire rotated while tightening the screw, the damper could end up crooked, so double-check its positioning [3].
When to Seek Professional Help from Cooper Piano

While tackling piano repairs yourself can save money, some situations call for professional expertise. For instance, if a damper feels loose or continues to ring despite the felt being intact, the issue might go beyond worn felt. Problems like a broken damper spring, a cracked flange, or a broken damper lever often require specialized skills and tools to fix properly [3].
High-end pianos, such as Steinway or Knabe models, often use specific brass hinge clips and unique flanges that demand precise handling to avoid damage. Repairs on these instruments are best left to experienced technicians. Similarly, if your piano has two damper felt pieces on a single damper board, servicing them effectively usually requires removing the action from the piano, which can be tricky [3].
Steve’s Piano Service suggests completing the task up to the gluing stage before calling in a professional. This allows you to handle the simpler steps, like gluing, while leaving the more critical alignment and regulation work to experts [3].
When minor fixes no longer solve the problem, it’s time to consider a full professional evaluation. With over 100 years of experience, Cooper Piano specializes in addressing complex repairs that go beyond felt replacement. Their technicians can handle intricate issues such as pedal trapwork problems – like loose sustain pedals caused by internal mechanical failures – and broader action concerns, such as keys that feel soft or produce tinny sounds. These issues often affect the damping function and may require professional regulation or voicing services [8].
Precision is key when it comes to damper alignment, as they need to be perfectly parallel to the strings. Craig Brougher, a seasoned piano technician, highlights the difficulty of this task:
One of the most important as well as difficult tasks of piano regulation are the dampers [1].
If achieving this level of accuracy proves challenging, Cooper Piano’s technicians can ensure your piano is correctly aligned and maintains its beautiful tone.
Conclusion
Over time, damper felts can harden and lose their ability to properly dampen the strings, leading to notes blending into a muddy, indistinct sound. Joseph Forster, a piano technician at Sterling Piano Tuning, highlights this issue:
Dampers don’t wear out nearly as fast as the hammers, but they can get hard and crusty if they are exposed to damp conditions. Then the dampers will… make an unpleasant buzzing noise [4].
Replacing damper felts is a manageable DIY project if done with precision. However, it’s important to align and regulate them carefully. Keep in mind that new felts may need a few days to settle and compress against the strings before they work at their best [9]. Once the replacement is complete, take time to test and confirm the results.
If the process feels overwhelming, don’t hesitate to call in professionals. Cooper Piano’s technicians, with over 100 years of expertise, can handle everything from fine-tuning damper alignment to resolving more complex mechanical problems. Their work ensures your piano retains its clarity and playability.
Whether you choose to handle it yourself or hire a professional, addressing damper maintenance is critical for preserving your piano’s sound quality and extending its lifespan.
FAQs
Can I replace damper felts without removing the action?
Replacing damper felts in an upright piano is often possible without taking out the entire action, especially if the felts are easy to reach or only require simple fixes like re-gluing. However, for more involved tasks – like aligning or replacing damper heads – removing part or all of the action might be necessary to achieve proper access and accuracy.
How do I know if ringing is felt wear or something else?
If your piano continues to ring or produce overtones for more than a second after releasing a key, it might be a sign of worn damper felt. Inspect the felt for any signs of wear, such as compression, looseness, or missing pieces. However, if the felt appears to be in good shape and the ringing still occurs, the problem could stem from other mechanical issues or the need for adjustments to the damper system.
What mistakes ruin damper alignment?
Damper alignment problems frequently occur when the felts used are either too thick or too thin, which interferes with consistent lifting. Thin felts, in particular, can strain the springs, resulting in uneven string contact. Beyond this, issues like misaligned damper heads or incorrect height adjustments during installation can cause sustain irregularities. To maintain proper alignment, it’s crucial to focus on precise centering, accurate spacing, and ensuring the damper heads move smoothly.