

Modern player pianos now connect to smart home systems, allowing you to control them through voice commands, apps, and even devices like Apple Watch. These pianos combine acoustic sound with digital features, enabling wireless playback, multimedia synchronization, and integration with platforms like Amazon Alexa and Sonos. Systems such as QRS PNOmation and Yamaha Disklavier make this possible, offering features like remote control, live artist playback, and educational tools. Older pianos can also be upgraded with compatible systems. Here’s a quick overview:
- Control Options: Voice commands (e.g., Alexa), mobile apps, and smart devices.
- Integration: Works with systems like Roku, Sonos, and Home Assistant.
- Setup: Requires a stable Wi-Fi connection, wireless bridges, and compatible hardware.
- Features: Schedule performances, sync with movies, and use as a learning tool.
How Player Pianos Connect to Smart Home Systems
What Are Player Pianos?
Player pianos are acoustic instruments capable of performing music automatically. Unlike their older counterparts that relied on punched paper rolls, modern player pianos use electromagnetic solenoids. These solenoids provide over 1,800 levels of force to replicate the subtle nuances of a live pianist. An advanced embedded supercomputer processes these actions within nanoseconds, ensuring the performance feels as authentic as a live playthrough [6][3]. While embracing digital control, these instruments preserve the traditional acoustic sound of hammers striking strings, which requires specialized piano maintenance. This blend of precision and tradition makes them compatible with smart home systems.
Technologies That Enable Smart Home Connection
Wi‑Fi is the backbone of smart home integration for modern player pianos. Systems like QRS PNOmation include a "Direct Wi‑Fi" mode, which establishes a private network. This setup allows users to control the piano via a smartphone or tablet without needing an external internet connection [5].
Voice assistants add another layer of convenience. For instance, QRS PNOmation 3 and 4 models work seamlessly with Amazon Echo and Dot devices, enabling voice-activated commands through Alexa [1]. Beyond voice control, users can manage their piano using an Apple Watch or even through the QRSTV channel on Roku TVs [2].
For those with older digital pianos, Bluetooth MIDI adapters such as the Yamaha UD‑BT01 can bring wireless functionality without requiring a complete upgrade [8]. Creative users have also linked MIDI-capable pianos to home automation systems like Home Assistant. By programming specific note sequences, these pianos can trigger smart home actions – like dimming lights or opening doors [7].
Benefits of Connecting Player Pianos to Smart Homes
Integrating a player piano with a smart home system opens up a world of possibilities. You can schedule performances to align with your daily routine, creating a personalized atmosphere at any time of day [9].
Another exciting feature is multi-media synchronization. Imagine your piano playing live accompaniment during a movie like La La Land or Phantom of the Opera, with the keys moving in perfect harmony with the soundtrack [9]. For families, the ability to record performances creates a "digital legacy", preserving cherished moments that can be enjoyed for years to come.
Additionally, research highlights the educational benefits of this technology. Musicians who use self-evaluation tools see a 30% improvement in their skill development. For children, engaging with interactive music features increases the likelihood of continuing their musical education by 40% [10].
sbb-itb-b8bc1ab
The QRS Piano that plays by itself – How to Use the QRS App
Step-by-Step Setup Guide
How to Connect Your Player Piano to Smart Home Systems: Complete Setup Guide
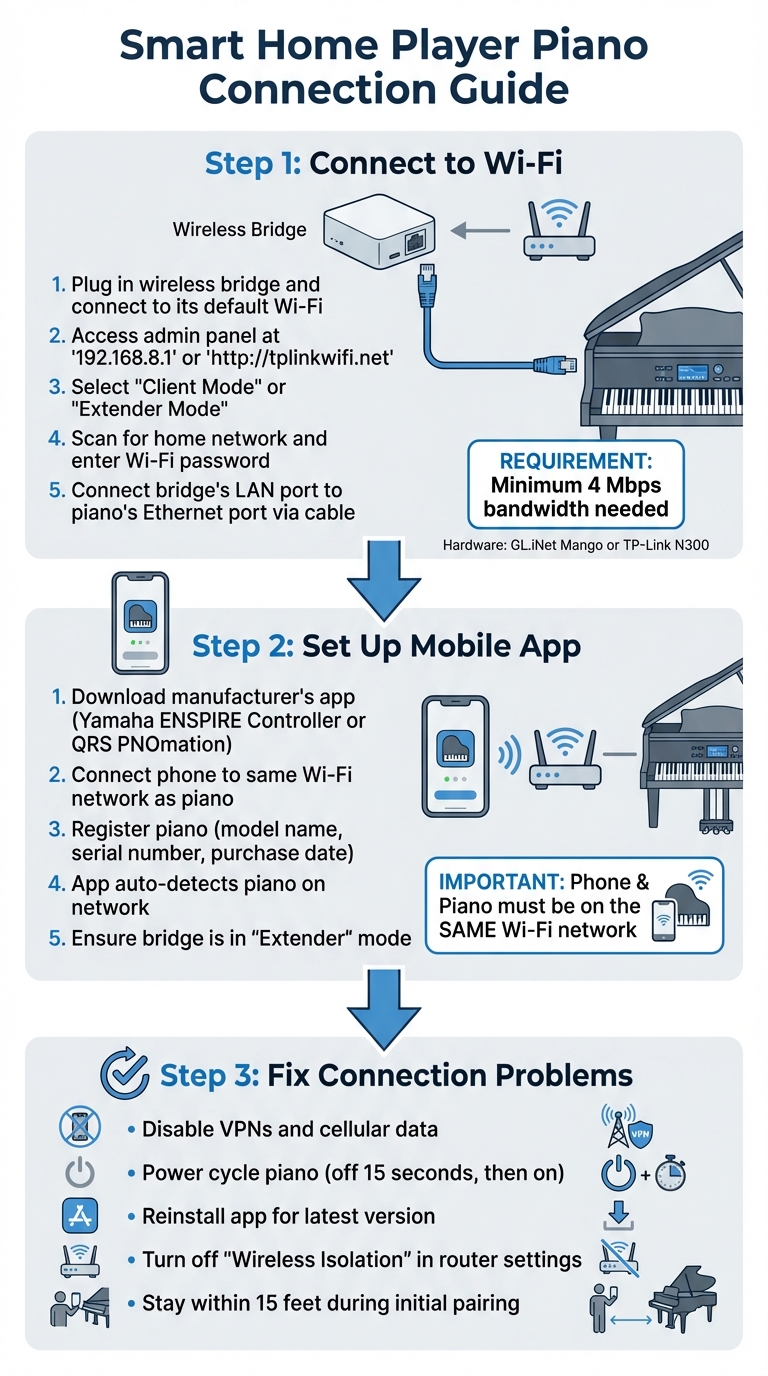
Connecting Your Player Piano to Wi-Fi
To connect your player piano to Wi-Fi, use a wireless bridge like the GL.iNet Mango or TP-Link N300. These devices link your piano’s Ethernet port to your home Wi-Fi network. Here’s how to set it up:
- Plug in the wireless bridge and connect to its default Wi-Fi.
- Access the admin panel by entering "192.168.8.1" or "http://tplinkwifi.net" in your browser.
- Select "Client Mode" or "Extender Mode", scan for your home network, and enter your Wi-Fi password.[11][12]
- Once the bridge connects to your network, use an Ethernet cable to link its LAN port to your piano’s Ethernet port.
For Yamaha Disklaviers, make sure the firmware is up to date (last update: October 2020) to ensure proper communication with Yamaha servers.[11]
For a more reliable connection, consider running an Ethernet cable directly from a nearby wall jack to your piano’s control unit. This eliminates the risk of wireless interference.[12]
Once the network connection is established, you can set up control using the manufacturer’s mobile app.
Using Mobile Apps for Setup and Control
Download the app designed for your piano model, such as the Yamaha ENSPIRE Controller or QRS PNOmation. Ensure your phone is connected to the same primary Wi-Fi network as your piano.[11]
When opening the app for the first time, you’ll need to register your piano. Enter details like the model name, serial number, and purchase date to unlock features and access online scores.[13] After registration, the app should automatically detect your piano on the network. If you’re using a wireless bridge, make sure it’s in "Extender" mode to allow the app to locate the instrument.
Your piano requires at least 4 Mbps of bandwidth for smooth streaming. As Peppe explains:
"The Disklavier doesn’t require very much bandwidth, but in my experience it operates less predictably below 4 Mbps."[11]
If your piano is in a large room or behind thick walls, consider using a Wi-Fi repeater to maintain a strong signal.
Fixing Common Connection Problems
If your app struggles to locate the piano, try these troubleshooting steps:
- Disable any VPNs and cellular data on your device to allow local Wi-Fi discovery.[15]
- Power cycle your piano by turning it off for 15 seconds, then back on.[12]
- Reinstall the app to ensure you have the latest version.[15]
Check your router settings as well. Make sure "Wireless Isolation" or "Client Isolation" is turned off so devices on the network can communicate.[11] For Yamaha systems using a UD-WL01 adapter, confirm it’s securely plugged into the correct USB port. If issues persist, try moving the adapter to the control unit’s USB port.[15] During the initial pairing process, stay within 15 feet of the piano to ensure a strong connection.[15]
Voice Assistant and Automation Setup
Setting Up Voice Commands
Player pianos like QRS PNOmation, PianoDisc, and Yamaha Disklavier can be paired with Amazon Alexa to enhance your experience[16][1].
For Yamaha Disklavier models, you’ll need a MusicCast WXA-50 or WXC-50 signal adapter. Start by connecting the piano’s Omni Out port to the adapter’s AUX Input using an audio cable. Then, open the MusicCast Controller app and assign a room name, such as "Piano Room." After that, link your MusicCast account to Alexa by enabling the MusicCast skill in the Alexa app. Run a "Discover Devices" scan to complete the setup. For the best sound, adjust the input trim to 6.0 dB for balanced volume levels[20].
If you’re using a Control4 system with OS 2.8.2 or newer, enable the Control4 Smart Home Skill in Alexa, and use the Voice Scene driver to create custom commands. To ensure everything stays connected, assign a static IP to your piano so it remains on the same Wi-Fi network as your other devices[17][19][20].
Once the setup is complete, you can use commands like "Alexa, play the Piano Room" for Yamaha or "Alexa, ask piano to play Diana Krall" for QRS. Standard Alexa controls such as "pause", "adjust the volume", or "skip a song" also work seamlessly[16][20][21]. Be mindful when naming devices – avoid using numbers or words like "on" or "off", as these can confuse Alexa’s voice recognition system[17][19].
After configuring voice commands, you can take things further by integrating your piano into smart home routines.
Creating Smart Home Routines
Smart routines let your player piano interact with other devices in your home, creating a more immersive and automated experience. For example, using the Control4 Voice Scene driver, you can design a "Cooking" routine. A simple command like "Alexa, turn on Cooking" could close your shades, brighten your kitchen lights, and start your favorite piano playlist – all at once[18][19].
| System | Required Skill | Key Hardware | Example Command |
|---|---|---|---|
| Yamaha Disklavier | MusicCast Controller | WXA-50 or WXC-50 Adapter | "Alexa, play the Piano Room." |
| QRS PNOmation | QRS Connect / Alexa Skill | Amazon Echo/Dot | "Alexa, ask piano to play Diana Krall." |
| Control4 Systems | Control4 Smart Home Skill | Control4 Controller (OS 2.8.2+) | "Alexa, turn on Party Mode." |
"The setup was incredibly easy and the reaction from friends is priceless… I’m addicted to the convenience of not having to reach for the remote or unlock my phone when what I really want to do is just enjoy the music."
– Steinway Piano Gallery of Naples[16]
For safety, avoid including actions like unlocking doors or opening garage doors in your piano routines. Some systems will disable the entire routine if prohibited commands are detected[17]. When naming your scenes, choose unique, descriptive labels like "Entertain" or "Movie Time" to ensure accurate voice recognition[17].
Hardware and Compatibility Requirements
This section dives into the essential hardware and network specifications needed for a seamless smart piano setup, building on the earlier setup guide.
Compatible Player Piano Models
Modern player piano systems, like the QRS PNOmation4 and Yamaha Disklavier (ENSPIRE, E3, Mark IV), now integrate smoothly with smart home ecosystems, working with devices such as Amazon Alexa and Apple Watch. The QRS PNOmation4, launched in 2024, is versatile enough to be installed in nearly any grand or upright piano, including popular brands like Steinway and Yamaha[4]. As of early 2026, the installation cost for this system is approximately $9,995[4].
For Yamaha Disklavier E3 or Mark IV owners, updating the firmware (last updated in October 2020) is crucial to enable internet connectivity. Alexander Peppe, an Authorized Yamaha Service Center Technician, emphasizes the importance of this update:
"If you haven’t updated your Disklavier’s firmware since October 2020, it is absolutely necessary to update it before attempting to connect to the internet"[11].
Older systems like PianoDisc, Concertmaster, and earlier Yamaha Disklaviers can gain smart home compatibility by upgrading with the QRS PNO4 system. Additionally, the QRS PNOscan MIDI record strip enhances these systems by scanning keys 1,000 times per second, ensuring highly accurate performance recording[4].
Required Accessories and Network Specifications
For reliable operation, a stable internet connection with at least 4 Mbps is necessary. However, as Peppe notes:
"stability and latency matter more than raw speed"[11].
Most player pianos come equipped with Ethernet ports only, making a wireless bridge essential for connecting to Wi-Fi. The GL.iNet "Mango" is a cost-effective option at around $30, offering 2.4 GHz connectivity while consuming just 1.3–1.5 watts – low enough to run off the piano’s USB port[11]. For faster 5 GHz networks, the GL.iNet "Opal" is a solid choice, though it requires external power since it exceeds the 2.5-watt output of a piano’s USB port[11].
When configuring your wireless bridge, set it to either Extender or Client mode to ensure your piano and control apps can communicate on the same network. Disable router settings like "Wireless Isolation", "Station Isolation", or "Client Isolation", as these can block communication between devices. It’s also best to avoid guest networks, which may restrict device discovery[11].
For voice control, you’ll need an Amazon Echo or Echo Dot. To connect your piano’s audio to a whole-house sound system, a Sonos Port works well[2]. Mount network hardware discreetly using 3M reclosable fasteners or heavy-duty zip ties, and protect your electronics with a surge protector like the Tripp Lite ISOBAR6ULTRA. However, keep in mind that surge protectors can interfere with Powerline adapters, as they tend to filter out the data signal[11][14].
| Hardware Category | Specific Examples | Purpose |
|---|---|---|
| Player Systems | QRS PNOmation4, Yamaha Disklavier ENSPIRE | Core self-playing mechanism and control center |
| Network Adapters | GL.iNet GL‑MT300N (Mango), Yamaha UD‑WL01 | Connects the piano’s Ethernet port to home Wi‑Fi |
| Smart Home Hubs | Amazon Echo, Echo Dot, Sonos Port | Enables voice control and whole‑home audio integration |
| Mounting Supplies | 3M 250 Reclosable Fasteners, 24‑inch Zip Ties | Secures routers and cables discreetly under the piano |
| Surge Protection | Tripp Lite ISOBAR6ULTRA | Protects electronics from power spikes |
Conclusion
Transforming your player piano into a smart home device bridges the gap between timeless acoustic music and modern technology. With this upgrade, your piano can respond to voice commands and mobile apps, all while maintaining its original sound. Imagine enjoying live music at parties, practicing alongside professional recordings, or exploring vast digital music libraries – all seamlessly integrated into your home.
To make this happen, focus on key elements like network stability, compatible hardware, and keeping software up to date. Many systems work effortlessly with devices you already own, such as smartphones, tablets, or voice assistants like Amazon Echo. You can even connect your piano to whole-home audio setups using tools like the Sonos Port.
Installation requires precision. As Cooper Piano points out, "Installing a piano system requires detail and specific instructions. These instructions must be followed with complete accuracy to ensure that the system is installed correctly and more importantly, without causing harm to the piano." Their factory-trained technicians, certified in Pianodisc and QRS player systems, bring the expertise needed to ensure your piano is upgraded safely and effectively.
This technology is highly adaptable, fitting nearly any piano style – from uprights to baby grands, even older models. With over a century of experience, Cooper Piano not only provides specialized player piano services but also offers exclusive player piano pricing for those seeking to modernize their instrument. This blend of technical know-how, quality hardware, and professional support turns your piano into a smart home centerpiece, offering both entertainment and educational opportunities. It’s a way to bring the timeless joy of live acoustic music into your everyday life.
FAQs
Will this work with my existing smart home setup?
Integrating a player piano system into your smart home setup is often doable. Systems like QRS PNOmation can connect wirelessly to your home network, allowing you to control them through apps, tablets, smartphones, or even devices like the Apple Watch. The key factor is ensuring your smart home supports Wi-Fi and app-based controls. For personalized advice, reach out to Cooper Piano or consult a professional who understands your specific setup.
Do I need professional installation for an older piano?
Professional installation is often the best choice when upgrading an older piano to a modern player piano system, particularly if the piano is vintage or lacks any digital features. While simple tasks like setting up a Wi-Fi connection might be easy to handle on your own, older or antique pianos need specialized care. Expert installers can ensure the system is integrated correctly without risking damage to the instrument, helping to maintain its value and ensuring it performs as expected.
What should I do if the piano won’t show up in the app?
To start, make sure your player piano is correctly connected to your Wi-Fi network. If needed, adjust the Wi-Fi settings by following the setup instructions provided with your system.
If the piano still doesn’t show up, try uninstalling and reinstalling the app. Also, double-check that your device is connected to the same Wi-Fi network as the piano. If the problem continues, refer to the system manual or try resetting your network settings before attempting to reconnect.