

Piano veneer, a thin decorative wood layer, adds beauty and stability to pianos but is prone to damage over time. Common problems include peeling, chipping, cracking, and sun-fading, often caused by temperature and humidity changes, physical impacts, or aging. Addressing these issues early prevents costly repairs and preserves your piano’s value. Minor damage like scratches or loose veneer can be fixed with DIY methods, but severe or structural damage requires professional expertise. Protect your piano by maintaining stable humidity (40–50%) and temperature (68–72°F), using covers, and scheduling regular inspections.
Piano Finish Repair – Small Chip to Walnut Veneer
sbb-itb-b8bc1ab
What Causes Veneer Damage
Knowing what leads to veneer damage is key to keeping your piano in good shape. The main culprits are environmental conditions, physical impacts, and the natural effects of aging.
Environmental Factors
Temperature and humidity are the biggest challenges for piano veneer. Wood reacts to moisture by expanding and contracts when it dries out. This constant shifting puts strain on the thin veneer layer and can weaken the adhesive underneath. Ideally, your piano should be kept between 68°F–72°F and at 40%–50% humidity [3]. Straying from these ranges can cause the wood to crack in dry conditions or soften and become unstable in high humidity.
"High heat can warp wooden components, affecting the piano’s overall integrity and sound. Conversely, extreme cold can weaken glue joints and cause action parts to freeze."
Direct sunlight and heat vents can also cause temperature fluctuations that stress the wood and adhesive. To combat this, use a hygrometer to monitor humidity, employ humidifiers or dehumidifiers as needed, and position your piano away from windows, vents, and drafts.
But environmental factors aren’t the only threats – physical damage is another common issue.
Physical Damage
Accidental impacts and improper handling can cause immediate harm to the veneer. Scratches, chips, or more severe structural damage often occur from bumps, placing heavy objects on the piano, or moving it without professional help. Older pianos, especially those over 25 years old, are particularly vulnerable because their veneer layers are more delicate.
Attempting DIY repairs without experience can make things worse. To protect your piano, invest in a quality cover and regularly dust and clean it to prevent wear.
However, even with the best care, the natural aging process can take its toll on the veneer.
Aging and Wear
Over time, the adhesive that bonds the veneer to the piano cabinet – often made from animal-based glue in older models – starts to break down. Exposure to heat and moisture speeds up this process, leading to issues like blisters, peeling, or chips. As wood ages, it loses its natural oils and moisture, becoming brittle and prone to fine cracks or crazing (a network of tiny cracks).
Varnish finishes used between the 1860s and 1920s are especially prone to crazing, which gives the surface an "alligatored" appearance.
"Varnish, used from the 1860s to the 1920s… tended to darken with age and exposure to sunlight, producing a crazed or ‘alligatored’ look."
- Piano Buyer Staff [2]
Additionally, the core material beneath the veneer might warp or shrink at a different rate than the veneer itself, creating tension that causes surface cracks. Over decades, repeated expansion and contraction can eventually make the veneer pull away from the core. Before attempting repairs on an older piano, inspect for loose veneer in areas prone to damage.
Types of Veneer Damage and How to Identify Them
Piano Veneer Damage Types: Identification and Repair Guide
Understanding the type of veneer damage is key to choosing the right repair method. Each type has its own visual markers, making it easier to diagnose the problem before attempting a fix or calling in a professional.
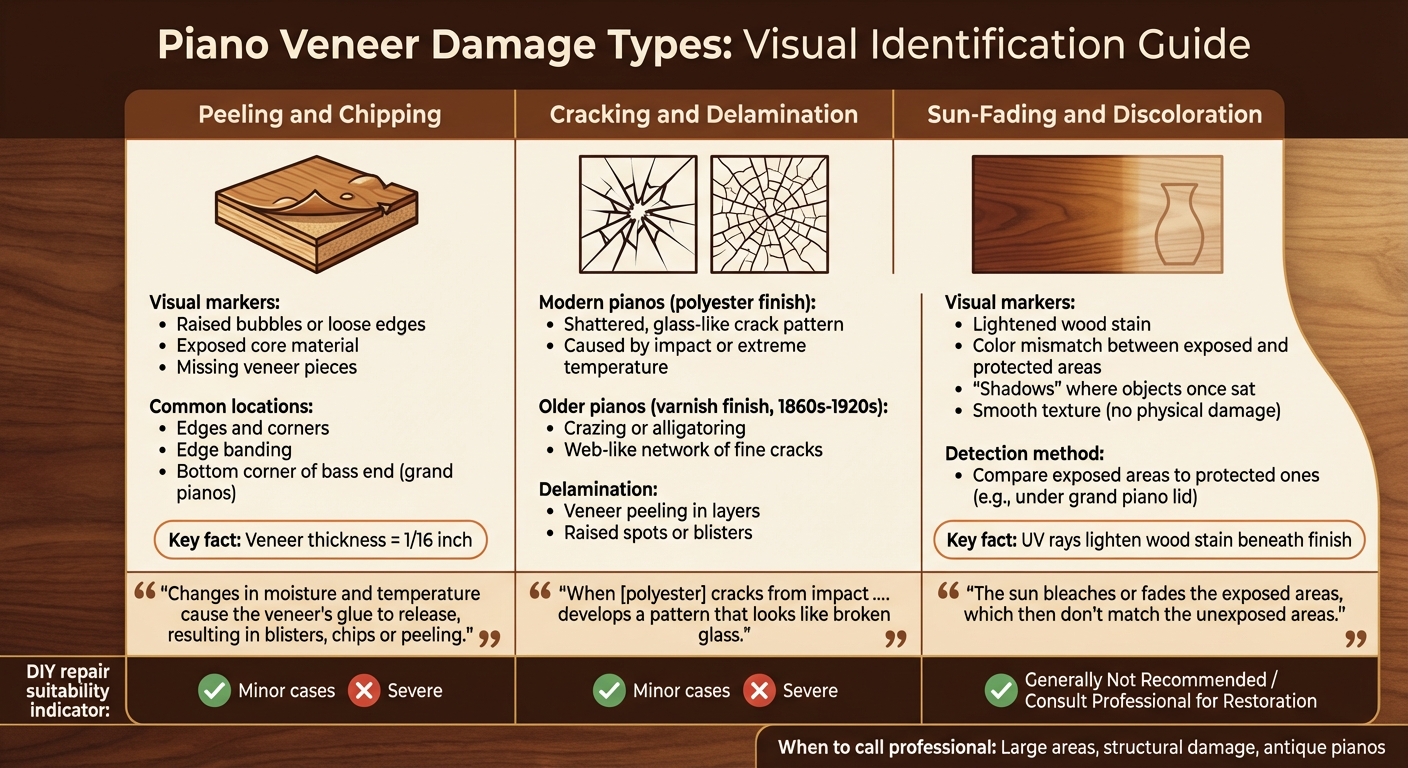
Peeling and Chipping
Peeling occurs when the veneer starts to lift away from the core material, forming raised bubbles or loose edges. This type of damage often shows up along edges, corners, and edge banding – the thin strips covering sharp edges of the piano. You might notice areas where the veneer seems to bubble or completely separate, exposing the material beneath.
"Changes in moisture and temperature cause the veneer’s glue to release, resulting in blisters, chips or peeling."
Chipping takes this a step further, with pieces of veneer breaking off entirely. This is particularly common at the bottom corner of the bass end on grand pianos, a spot that bears much of the instrument’s weight during moves [2]. Given that piano veneer is only about 1/16″ thick [2], even slight impacts can cause chips in these vulnerable areas.
Next, look for cracks or separations, which may signal deeper adhesion problems.
Cracking and Delamination
Beyond surface-level damage, cracks or full-layer separations can appear. Cracks often depend on the piano’s finish and age. For modern pianos with a polyester finish, impacts or extreme temperature changes can cause a shattered, glass-like crack pattern [2]. These cracks are brittle and usually require removing all damaged polyester before repairs.
"When [polyester] cracks from impact or being dropped… the damaged area develops a pattern that looks like broken glass."
- Piano Buyer Staff [2]
Older pianos with varnish finishes (common from the 1860s to the 1920s) often develop crazing or alligatoring – a web-like network of fine cracks. This happens as the varnish ages, darkens, and deteriorates under sunlight over decades. Delamination, on the other hand, refers to the veneer peeling away in layers, forming raised spots or blisters. Heat and humidity are usually the culprits, weakening the adhesive bond [1].
Sun-Fading and Discoloration
Not all damage is physical – ultraviolet light can also alter the piano’s appearance. Sun-fading occurs when UV rays lighten the wood stain beneath the finish [2]. The best way to spot this is by comparing exposed areas to protected ones. For example, on a grand piano, folding back the front lid often reveals a richer, darker color underneath, highlighting the faded areas.
"Typically, when the front lid of a grand piano is folded back over the rear portion, the sun bleaches or fades the exposed areas, which then don’t match the unexposed areas."
- Piano Buyer Staff [2]
You might also see "shadows" where objects like picture frames or vases once sat, shielding small sections from UV rays while the surrounding veneer lightened. Unlike chips or scratches, sun-fading doesn’t affect the texture – it’s purely a color change, leaving the surface smooth to the touch.
DIY Repair Methods for Minor Damage
Once you’ve identified minor damage, you can often handle the repairs yourself. Most simple fixes take about two to four hours[2] and cost between $100 and $250 in supplies[5]. However, it’s important to recognize your limits. DIY repairs are ideal for surface scratches, small chips, or loose veneer edges. For structural or extensive damage, it’s better to call in a professional.
Here’s how you can tackle some common veneer issues to restore the look of your piano.
Fixing Scratches and Surface Marks
Start by cleaning the damaged area with a quality furniture cleaner or a mild soap-and-water mix. This ensures you’re not grinding dirt into the surface. After cleaning, run your nail over the scratch – if you feel a groove, it needs to be filled. For smooth, barely visible scratches, a wood marker or stain pen can often do the trick[4].
"If you can feel it, you’ll see it."
For deeper scratches, use a wax stick that matches the veneer’s color. Gently press the wax into the scratch and smooth it out with a plastic tool – avoid using metal tools to prevent further damage. Always work along the wood grain, and test any color-matching product on an inconspicuous area first.
Once scratches are addressed, you can move on to repairing loose veneer.
Reattaching Loose Veneer
Peeling or bubbling veneer can often be fixed at home with the right approach. Carefully lift the loose section using a plastic putty knife and remove any old glue residue. Clean both surfaces with mineral spirits to prepare them for reattachment. If you’re dealing with small bubbles, create a tiny hole and inject wood glue into the bubble. Avoid super glue – it’s not ideal for wood. Use wood glue or contact cement for a stronger bond.
Clamp the veneer firmly into place, using wax paper between the surfaces to prevent sticking, and let it dry for 24 hours[4]. For stubborn blisters, cover the area with wax paper and cardboard, then press it down with a medium-hot iron, checking every few minutes until the veneer flattens.
Once the veneer is secure, you’ll likely need to sand and refinish the area for a smooth, uniform look.
Sanding and Refinishing Small Areas
After reattaching veneer or fixing scratches, sanding and refinishing may be necessary to blend the repair. Use fine-grit sandpaper (320–400 grit) and work gently along the wood grain. Be cautious – piano veneer is very thin, and sanding too aggressively can expose the core material.
Once the surface is smooth, apply a matching stain or clear coat. To identify the finish, test a hidden spot with denatured alcohol. For high-polish finishes, you can use Micro-Mesh cloths, gradually working up to 12,000-grit for a mirror-like shine. Allow the topcoat to cure for 2 to 3 days[5] before using the repaired surface.
These steps can help you restore your piano’s appearance while saving on professional repair costs.
When to Call a Professional
While some piano repairs can be handled at home, more complicated issues demand the expertise of a professional. Attempting to fix major damage yourself can not only worsen the problem but also decrease your piano’s overall value. As Cooper Piano wisely puts it:
"Piano repair is not a DIY project. There are some things better left in the hands of trained specialists, and brain surgery and piano repair are the two top ones…" – Cooper Piano [7]
For anything beyond minor surface damage, it’s best to consult a professional to ensure your instrument’s value and integrity remain intact.
Large or Structural Damage
When your piano suffers from severe peeling, widespread veneer delamination, or large blisters, it’s time to call in the experts. Spot repairs won’t cut it for these types of issues, especially if the damage extends to the frame or soundboard. These structural components are critical to your piano’s performance, and improper repairs can lead to even more costly problems down the line. A professional technician has the tools and experience to address these challenges without compromising the instrument’s quality.
Matching Veneer and Finish
One of the most difficult aspects of piano repair is achieving a flawless match in veneer and finish. Professionals excel in this area, using specialized tools like burn-in sticks and hand-painting techniques to replicate wood grain and color. They can even mimic the micro-scratches of satin finishes to ensure light reflects just as it does on the original surface. This level of precision is nearly impossible to achieve with DIY methods.
"Good furniture-repair technicians are skilled at color matching, and have access to dyes, pigments, and manufacturers’ color formulas; usually they can match any variation of ‘black,’ and any wood colors." – Piano Buyer Staff [2]
A poorly executed DIY repair can leave obvious imperfections that draw attention to the damage, while a professional can make it virtually invisible.
Restoring Antique or High-Value Pianos
Antique or high-value pianos require an even greater level of care. These instruments often feature rare and intricate veneer patterns that are difficult to replicate. Amateur repairs can significantly reduce their resale value, but skilled restoration can preserve their beauty and functionality for decades – sometimes extending their lifespan by 50 to 70 years [10].
Professional restorations aren’t cheap, ranging from $2,000 to $17,000 [9], with extensive projects climbing to $10,000–$50,000 [10]. However, this investment is often justified when you consider that new handmade pianos of similar quality can cost anywhere from $41,000 to $150,000 [10]. To ensure the best results, look for a restorer with at least 30 years of experience, review their portfolio, and confirm they offer warranties. Top restorers typically provide 5-year warranties on soundboards and up to 15–20 years on other components.
Cooper Piano’s restoration services are an excellent resource for evaluating your piano and determining the most effective way to preserve its value and craftsmanship for future generations.
How to Prevent Veneer Damage
Protecting your piano’s veneer doesn’t have to be complicated. A few thoughtful habits can go a long way in preserving its finish and avoiding costly repairs. By managing your environment and practicing proper care, you can ensure your piano stays in excellent shape for years.
Controlling Humidity and Temperature
Piano veneer is sensitive to changes in moisture and temperature. Low humidity can cause the wood to shrink and crack, while high humidity may lead to swelling or even mold. To keep your piano safe, aim for an indoor humidity level between 40% and 50% and a steady temperature between 68°F and 72°F [3]. A hygrometer is a handy tool to monitor these levels, and you can adjust as needed with a humidifier or dehumidifier.
Placement matters, too. Keep your piano away from vents, fireplaces, doors, windows, and direct sunlight, as these can cause sudden temperature shifts that damage the finish [3]. Avoid areas like kitchens and bathrooms, where moisture levels frequently fluctuate [11]. If your piano is in a humid or poorly ventilated spot, opening the lid occasionally can improve air circulation [11].
For added protection, consider using a cover to shield your piano from external elements.
Using Protective Covers
A well-fitted piano cover offers a simple way to guard against dust, dirt, and sunlight, all of which can harm the finish. When your piano isn’t in use, keep it covered and close the lid to prevent oils, grime, or accidental spills from causing damage.
It’s also wise to avoid eating or drinking near your piano. Even something as small as a water ring from a vase can result in repairs costing hundreds of dollars [11]. If a spill does occur, clean it up immediately, but avoid pressing the keys during cleanup to prevent liquid from seeping into the internal mechanisms [11].
While covers provide day-to-day protection, regular inspections ensure your piano remains in top condition over time.
Regular Maintenance and Inspections
Scheduling professional inspections can help catch minor issues like blisters, glue release, or tiny cracks before they escalate [1][3]. Services from experts like Cooper Piano can address these concerns early, keeping your piano in peak condition. Routine check-ups, combined with proper climate control and protective measures, will preserve your piano’s beauty and extend its lifespan for generations. Taking these steps not only prevents veneer damage but also maintains the value and charm of your instrument.
Conclusion
Taking care of piano veneer damage as soon as it appears is key. Whether it’s caused by environmental conditions, physical wear, or aging, damage can quickly worsen if left unaddressed. Acting early helps maintain your piano’s value and keeps it looking and sounding its best.
While it might be tempting to fix minor scratches on your own, DIY repairs can often do more harm than good. Mistakes could lead to permanent damage [1]. Professional technicians bring the right tools, expertise, and an eye for detail to spot hidden issues and ensure repairs are both structurally sound and visually seamless [8].
As Cooper Piano highlights:
"By investing in professional piano repair services, you’re ensuring that your beloved instrument is not only restored but also preserved for future generations to enjoy." – Cooper Piano [8]
If you notice peeling, cracking, or discoloration on your piano, don’t delay. Cooper Piano, with over a century of experience, offers expert craftsmanship to restore your piano’s appearance and sound. From minor touch-ups to full veneer restoration, their skilled technicians provide the care your piano needs.
Reach out to Cooper Piano today for a thorough evaluation and estimate. Protect your piano and ensure it remains a cherished instrument for years to come.
FAQs
How can I tell if veneer damage is cosmetic or structural?
Veneer damage can be categorized into two types: cosmetic and structural. Cosmetic damage involves surface issues like chips, peeling, or dents that don’t affect the wood beneath. Structural damage, on the other hand, includes cracks, warping, or harm to the underlying wood or soundboard, which may jeopardize the piano’s stability and sound performance.
What glue should I use for loose piano veneer?
For fixing loose piano veneer, opt for a strong, wood-friendly adhesive such as contact cement or hide glue. These adhesives are well-suited for thin veneer layers and create a reliable bond. Before applying the glue, make sure the surface is thoroughly cleaned and free from any old glue residue to ensure a secure and lasting repair.
Will veneer repairs affect my piano’s value?
Veneer repairs can bring back the polished look of your piano and might even help retain its value, depending on how well the repair is executed and the piano’s overall state. Opting for professional restoration is usually a smart choice, as skilled work can help maintain – or in some cases, improve – the piano’s worth.