


Cracks in a piano soundboard can impact sound quality, causing muted notes, buzzing, or rattling. While minor cracks may be fixable with DIY methods, larger or structural issues often require professional help. Here’s what you need to know:
- Causes: Fluctuating humidity, age, or physical damage.
- Signs: Visible cracks, buzzing sounds, or loose ribs.
- DIY Repairs: Use wood shims or epoxy for small cracks, but be cautious – incorrect fixes can worsen damage.
- When to Call a Professional: For through cracks, rib separations, or severe damage.
Prevent future issues by maintaining stable humidity (40-50%), keeping the piano away from heat or drafts, and scheduling regular inspections. Proper care ensures your piano continues to produce beautiful music.
1918 Krakauer Grand Piano Soundboard Repair (Soundboard Crack Myths Explained)

What Causes Soundboard Cracks and How to Spot Them
Spotting cracks in a soundboard is crucial for maintaining its performance and longevity. Cracks can appear for various reasons, but catching them early through careful visual and audible checks can make a big difference. Once identified, you can start exploring repair options to address the issue.
Types of Cracks and How to Identify Them
- Surface cracks: These are thin, hairline splits that follow the wood grain. They’re often found between the structural ribs or near the bridge. Use good lighting to spot these subtle cracks.
- Through cracks: These are more severe, running entirely through the soundboard. You might notice them if light shines through the crack or if you feel airflow passing through.
- Rib separation: This occurs when the wooden ribs become loose or misaligned. It’s often visible as gaps between the ribs and the soundboard, and you might hear rattling sounds when playing.
For a thorough inspection, remove any panels that block your view of the soundboard. Examine the entire surface methodically, starting from the treble section and moving toward the bass. The type and severity of the cracks you find can directly impact your piano’s tonal quality.
How Cracks Affect Your Piano’s Sound
Cracks can significantly alter the way your piano sounds. They may cause notes to sound muted or dull and could even produce buzzing or rattling noises. Since cracks disrupt the soundboard’s ability to vibrate evenly, they allow acoustic energy to escape, leading to reduced volume and clarity. These changes can make the piano’s sound feel less cohesive and less vibrant overall.
DIY Repair vs. Professional Help: Which to Choose
Deciding between DIY and professional repair depends on the extent of the damage, your skill level, and the value of your piano. Understanding the situation thoroughly will help you make the best choice for your instrument.
How to Check Damage Severity
Start by inspecting the soundboard under good lighting. Look for visible cracks, splits, or separations. Run your fingers across the surface to feel for uneven spots – these could signal damage. Pay special attention to areas where the wood feels uneven or where separation is visible.
Listening to your piano can also reveal issues. Play various keys and listen closely. If cracks cause separated wood pieces to rattle or buzz against each other or the piano’s rear bracing, the damage likely needs attention [2].
Here’s a quick guideline: cracks wider than 1/16 inch or the width of a penny should raise concern, particularly if they produce buzzing or rattling sounds [1][2]. Also, check for any separation between the soundboard and its glue joints along the ribs, liner, or rim. This could indicate more serious structural problems [1].
DIY Repair: Benefits and Risks
Handling minor soundboard repairs yourself can save money. For example, securing loose ribs or fixing small surface cracks might be manageable if you’re handy with tools.
However, the risks are worth considering. Piano construction is intricate, and attempting DIY repairs without sufficient expertise can worsen the damage, affect sound quality, or even reduce the piano’s value. A single mistake with tools or adhesives could turn a minor issue into a costly repair.
Improper fixes can also diminish the instrument’s worth. If the damage is beyond basic repairs, it’s better to leave it to a professional.
When You Need a Professional
For extensive or complex damage, professional help is a must. Incidents like drops, floods, or major structural issues often require removing the plate and replacing the soundboard [2]. This level of repair involves specialized tools, skills, and a workspace that most DIY enthusiasts don’t have.
If you notice multiple cracks, separations, or hear unwanted noises, it’s time to call in a professional. The decision to repair should take into account both the monetary and sentimental value of the piano [1]. Certified technicians can provide an objective assessment and guide you through your options.
For example, Cooper Piano, with over 100 years of experience, offers detailed inspections and tailored recommendations. Their certified technicians understand that repair costs depend on the location and severity of the damage [1]. They’ll help you decide whether repairing or replacing the soundboard makes the most sense financially.
Keep in mind that cracks often cause minimal changes in sound, which may be imperceptible to most listeners. The overall construction and materials of the piano typically have a greater impact on its tone [2]. A professional evaluation can help you determine if repairs will significantly enhance your piano’s performance and lifespan.
Tools and Materials You’ll Need
Having the right tools and materials is essential for successful soundboard repairs, whether you’re sticking with traditional wood shims or opting for modern synthetic epoxy solutions.
Basic Repair Tools
Start with high-quality wood glue that dries clear and stays flexible. You’ll also need a variety of clamps – C-clamps and bar clamps are particularly useful – to hold everything securely while the glue sets.
For traditional repairs, gather spruce wood strips that match your soundboard’s grain and thickness. Add fine-grit sandpaper (220 grit or finer) and wood scrapers to your toolkit for shaping and smoothing the repair area.
However, as Daniel Chupp of Chupp’s Pianos points out, traditional wood shims come with challenges:
"The new piece of wood is going to expand and contract at a different rate. Even if you could magically make your shim fit perfectly, the newer wood will begin to expand and contract in a fairly short time. This means you’ll soon have a crack on either side of the repair" [3].
Synthetic epoxy offers a more stable option. This material forms a strong bond with the original soundboard without requiring you to widen the crack significantly. Because it expands and contracts at a similar rate to the original wood, it minimizes the chances of new cracks forming [3].
Other essentials include wood stain and varnish to blend the repair seamlessly with the existing finish. Always test these on a hidden area first to ensure a good color match. A small brush set will help you apply finishes precisely, while clean rags are handy for wiping away excess material.
Finally, measuring tools like rulers and calipers are crucial for assessing crack dimensions and guiding your repair process.
Setting Up Your Workspace Safely
A controlled workspace is just as important as the tools themselves. Maintain a stable environment with a temperature between 68-72°F and humidity levels of 40-50% to prevent the wood from expanding or contracting [4].
Place your piano on a sturdy, level surface, away from windows, heaters, or vents to avoid sudden temperature changes [4]. Equip yourself with safety glasses and nitrile gloves to protect against adhesives and tools, and cover nearby furniture to guard against dust and spills.
Good lighting is a must. Use adjustable LED lights to eliminate shadows, and choose natural daylight bulbs for accurate color matching. Keeping your workspace organized also makes a big difference – set up designated areas for tools, materials, and waste disposal. Have clean-up supplies like mineral spirits and paper towels on hand for managing spills or excess stain.
Lastly, ensure proper ventilation. Open windows or use fans to keep the air circulating when working with adhesives, stains, or varnishes. Just be cautious about creating drafts, as they can disrupt the temperature stability around your piano.
sbb-itb-b8bc1ab
How to Repair Soundboard Cracks Step by Step
Once your workspace is set up and your tools are ready, you can begin addressing common soundboard issues. These steps are ideal for fixing hairline cracks and minor structural problems. However, if the damage is extensive, it’s best to consult a professional.
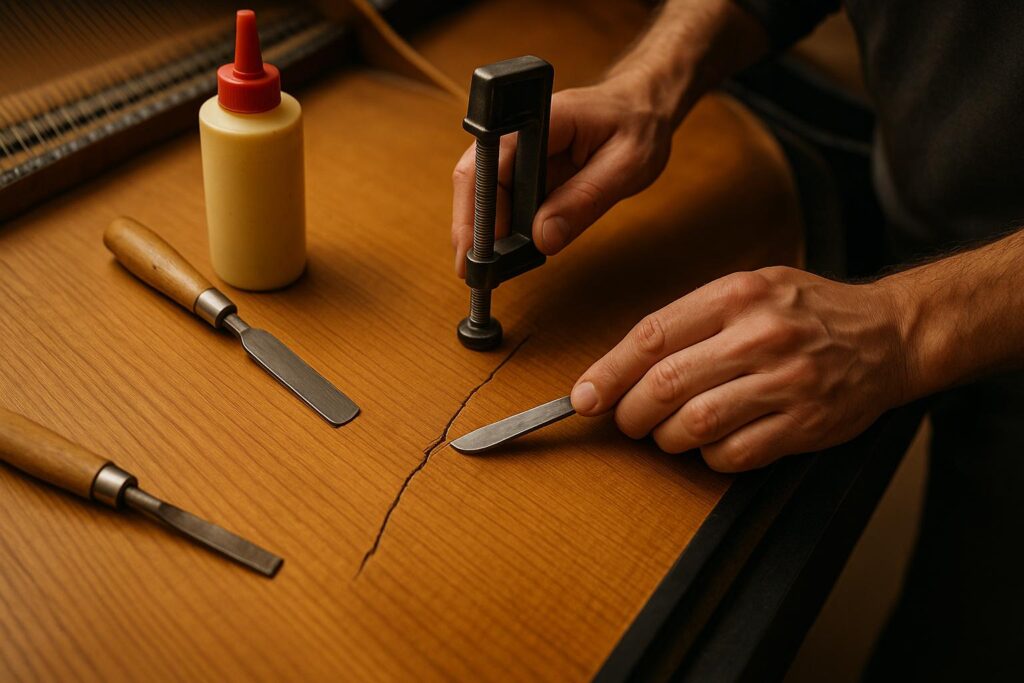
Fixing Cracks with Shims
Start by thoroughly cleaning the crack. Use a thin tool and compressed air to remove any debris, ensuring the area is clean for a strong bond.
Next, prepare a spruce shim. Cut a thin strip of spruce wood that’s slightly wider than the crack and about 1/16 inch thick. The grain of the shim should align with the soundboard’s grain. Sand the shim carefully until it fits snugly into the crack without requiring excessive force. A snug fit is key for a seamless repair.
Apply a small amount of wood glue along the edges of the crack using a small brush or syringe. Be careful not to overapply, as excess glue can seep into the wood grain and leave visible stains. Gradually insert the shim into the crack, pressing evenly.
Use C-clamps to secure the repair, placing protective wax paper between the clamp and the surface to prevent glue from sticking. Tighten the clamps gradually until you see a thin glue line appear along the crack.
Let the glue cure for 24 hours before removing the clamps. Once the glue has dried, use a sharp chisel to trim the shim so it sits flush with the soundboard surface. Sand the area smoothly, starting with 220-grit sandpaper and finishing with 320-grit.
To match the finish, apply a wood stain similar to the soundboard’s color. Test the stain on an inconspicuous area first to ensure it blends well. Once the stain dries, apply thin coats of varnish, sanding lightly with 400-grit sandpaper between coats.
If you notice structural rib separation on your soundboard, move on to the next section for guidance on reattaching loose ribs.
Reattaching Loose Ribs
Loose ribs can cause buzzing sounds and lead to more serious soundboard problems if left untreated. To address this, start by identifying the loose section. Gently press along the rib while listening for movement or gaps.
Clean both the rib and the soundboard surfaces where they meet. Remove any old glue residue with a chisel or scraper, taking care not to damage the wood. The surfaces should be smooth and free of debris for a strong bond.
Apply a thin, even layer of fresh wood glue to both surfaces. Avoid using too much glue, as it can weaken the bond and make cleanup messy. Carefully align the rib with the adjacent ribs and position it correctly.
Secure the rib with bar clamps or specialized rib clamps, spacing them every 6-8 inches along the loose section. Apply firm but not excessive pressure – enough to close gaps without crushing the wood fibers.
Allow the glue to cure for 24 hours. During this time, avoid moving the piano or applying string tension to ensure the bond sets properly.
How to Prevent Future Cracks
A well-done repair can last, but consistent maintenance is essential to prevent future problems. Here are some tips to help you protect your soundboard:
- Keep the humidity level in your piano’s environment between 40-50%. Use a humidifier during dry winters and a dehumidifier in humid summers if necessary.
- Position your piano away from direct heat, sunlight, or drafts, which can cause the wood to dry out or warp.
- Schedule inspections every six months to catch small cracks, loose ribs, or changes in the soundboard’s surface early. Addressing issues promptly can save you from costly repairs down the line.
- Tune your piano regularly, but avoid over-tightening the strings. Excessive tension can strain the soundboard and lead to damage. A skilled piano technician can ensure the strings are properly tensioned for your instrument.
- Keep a maintenance log to track humidity levels, temperature shifts, and any new cracks or unusual sounds. This record can help identify patterns and prevent recurring issues.
Professional Soundboard Repair with Cooper Piano


Fixing minor soundboard issues yourself might be manageable, but when it comes to significant cracks or complex problems, professional expertise is key. That’s where Cooper Piano steps in, combining skilled craftsmanship with a comprehensive approach to piano care.
Why Choose Cooper Piano?
With over a century of experience, Cooper Piano has become a trusted name for soundboard repairs [5]. Their technicians not only fix visible cracks but also identify hidden structural problems that could lead to future damage. This attention to detail reflects their commitment to providing thorough, honest repairs – without pushing unnecessary services.
Comprehensive Piano Care Services
After repairing a soundboard, maintaining your piano’s overall performance is essential. Cooper Piano offers a range of services designed to complement soundboard repairs and keep your instrument in top shape.
- Piano tuning: Structural adjustments during repairs can affect string tension and pitch. That’s why Cooper Piano emphasizes the importance of tuning after repairs. They recommend scheduling two tunings per year to maintain stability [6]. Their technicians even provide in-home tuning services to ensure your piano stays in perfect harmony.
- Full piano restoration: If soundboard damage is part of a larger issue, full restoration might be the best option. Cooper Piano’s team can rebuild action mechanisms, replace worn hammers, refinish the case, and address other age-related wear. This approach often proves more efficient and cost-effective than handling individual repairs piecemeal.
- Piano appraisals: For those uncertain about the financial viability of extensive repairs, Cooper Piano offers certified appraisals. These evaluations consider the piano’s current condition, repair costs, and potential post-repair value, helping with decisions related to insurance, estate planning, or selling [5].
- Player piano services: Player pianos come with their own set of challenges, particularly when it comes to the interaction between pneumatic systems and soundboard vibrations. Cooper Piano’s specialized expertise ensures that repairs maintain both the sound quality and functionality of these unique instruments.
Conclusion
Fixing a cracked piano soundboard requires careful evaluation, the right tools, and a clear understanding of what can and cannot be done on your own. While small surface cracks might be addressed with DIY shim repairs, keep in mind that wood expansion can sometimes worsen these fixes over time [3]. For more severe or structural issues, it’s always best to consult a professional.
Beyond repairs, prevention is key to keeping your soundboard in good shape. Controlling the environment is crucial – maintaining humidity levels between 40% and 50% and using proper humidity control tools can go a long way in preventing cracks from forming [1]. Regularly inspecting the soundboard, including running your fingers over it to detect any raised areas, can help you catch potential problems early when they’re easier to handle [1].
Certified piano technicians bring the expertise to spot hidden structural issues that might not be visible to the untrained eye [1]. Additionally, synthetic wood epoxy provides a more stable and lasting solution compared to traditional shims, reducing the risk of future damage [3].
Whether you choose to tackle minor repairs yourself or rely on professional assistance, the ultimate goal remains the same: preserving your piano’s sound quality and structural stability. With regular maintenance and timely attention to repairs, your piano’s soundboard can continue to deliver beautiful music for years to come.
FAQs
What should I know before trying to repair a cracked piano soundboard myself?
Repairing a cracked piano soundboard on your own can be a delicate and risky endeavor. There’s always the chance of unintentionally making the damage worse, weakening the soundboard’s structure, or even voiding any existing warranties. Before taking any action, it’s crucial to assess the severity of the crack. Small cracks might be fixable with the right tools and techniques, but more extensive damage usually calls for the expertise of a professional.
If you decide to tackle the repair yourself, make sure to use top-quality materials and follow trusted expert guidelines to avoid affecting the piano’s sound or value. That said, if the piano is a prized or high-end instrument, seeking help from a professional repair service is strongly advised. This ensures the instrument’s performance and lifespan remain intact.
How can I maintain proper humidity levels to protect my piano’s soundboard from cracking?
Maintaining proper humidity is key to protecting your piano’s soundboard from potential damage, like cracking. To keep an eye on the humidity levels, use a hygrometer and aim to maintain them within the 40% to 50% range. If the humidity in your space tends to swing wildly, consider using a humidifier or dehumidifier to create a stable environment.
Be mindful of where you place your piano. Avoid spots near heating vents, air conditioners, direct sunlight, or damp areas, as these conditions can expose the instrument to extreme temperature and moisture changes. Keeping the climate consistent helps minimize the expansion and contraction of the wood, reducing the risk of cracks and extending your piano’s lifespan.
What makes synthetic epoxy a better choice than wood shims for repairing a cracked piano soundboard?
Synthetic epoxy brings several benefits to the table when it comes to fixing a cracked piano soundboard, especially compared to traditional wood shims. One of its standout features is its ability to form a strong yet slightly flexible bond. This flexibility is key – it helps prevent new cracks from forming while keeping the soundboard structurally sound. Unlike rigid wood shims, epoxy can be tailored to mimic the spruce soundboard’s characteristics, ensuring the piano retains its tonal quality and transmits vibrations effectively.
Another big advantage is epoxy’s resilience against moisture and environmental shifts. This makes it a far more dependable choice for long-term repairs. Its durability minimizes the chances of the soundboard re-cracking or warping over time, safeguarding both the piano’s sound and its value for years to come.